Table of Contents
- Common Reasons Your Stun Gun Fails to Charge
- Step-by-Step Guide to Diagnosing Charging Issues
- Effective Solutions to Restore Your Stun Gun’s Battery Life
- Preventative Tips to Maintain Optimal Charging Performance
- To Wrap It Up
Common Reasons Your Stun Gun Fails to Charge
Several factors can cause your stun gun to refuse charging, and identifying these common culprits is the first step toward a solution. One frequent issue is a faulty or damaged charging cable. Cables may degrade over time due to daily wear and tear or internal wire breakage that’s invisible to the naked eye. Additionally, the charging port itself can become clogged with dirt or debris, obstructing the connection between the charger and the device’s battery. Corrosion on the contact points from moisture exposure is another common problem that hinders the charging process.
Another pivotal reason revolves around the internal battery’s health. Most stun guns rely on rechargeable batteries that eventually lose their ability to hold a charge after repeated cycles or prolonged storage without use. In some cases, manufacturing defects or faulty internal circuitry can also disrupt the charging mechanism. Finally, always double-check if you’re using the original charger or a compatible replacement; inconsistent voltage or amperage from third-party chargers can significantly affect charging performance and may even damage the stun gun.
Step-by-Step Guide to Diagnosing Charging Issues
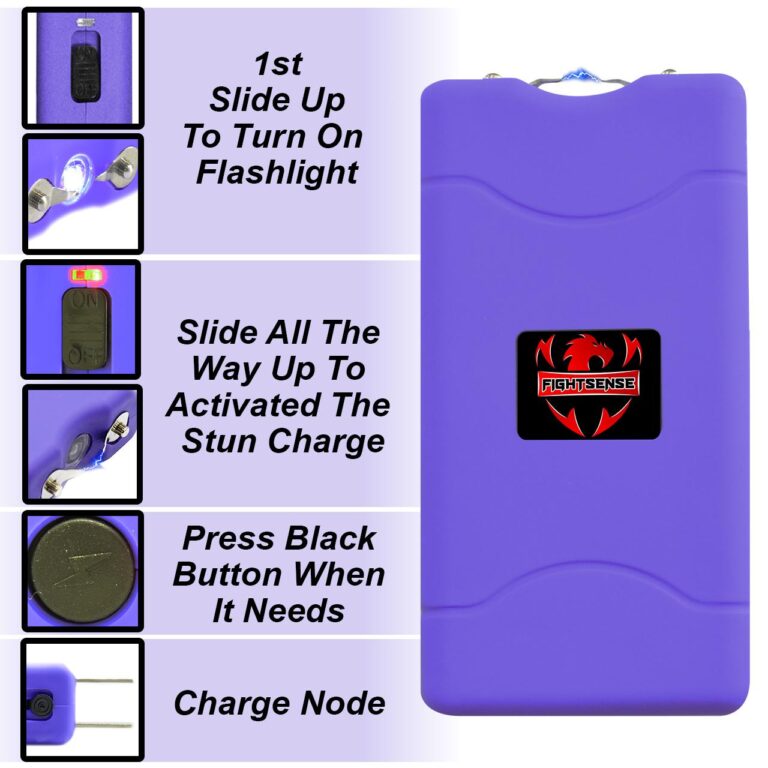
Start by examining the charging cable and adapter for any visible damage such as frayed wires, cracks, or burn marks. Faulty cables or adapters are often the culprit behind charging failures. Next, ensure that your power source-whether a wall outlet, power strip, or USB port-is functioning properly by testing it with another device. If the power source and charging components appear intact, gently clean the charge port on the stun gun using a soft brush or compressed air to remove dust and debris that might be blocking the connection. Avoid inserting anything metallic, as this can cause further damage.
Once the physical connectors are verified, check the stun gun’s internal battery status, if your model offers such an indicator or diagnostic mode. Some devices have LED indicators or a digital screen displaying charging status. If no lights or signs of charging appear, try a different compatible charger to rule out charger-specific issues. Additionally, perform a soft reset or power cycle by removing the battery (if possible) for a few minutes before reconnecting and attempting to charge again. If all these steps fail, the problem may lie within the battery or internal circuitry, indicating that professional repair or battery replacement might be necessary.
Effective Solutions to Restore Your Stun Gun’s Battery Life
When your stun gun’s battery performance starts to decline, simple maintenance techniques can often breathe new life into it. Begin by ensuring the charger and charging port are free from dirt and corrosion-use a soft-bristled brush or a cotton swab dipped in isopropyl alcohol to clean the contacts gently. Also, always charge your device with the original charger or a compatible replacement to prevent voltage inconsistencies that could damage the battery. If your stun gun has been unused for a long time, try performing multiple short charging cycles to help recalibrate the battery’s capacity.
Additional strategies to restore battery life include:
- Storing the stun gun in a cool, dry place to avoid heat-induced battery degradation
- Running a full discharge followed by a full charge cycle every few months to maintain battery health
- Checking and tightening connections inside the stun gun if accessible
- Replacing the battery pack if it’s visibly swollen or shows signs of leakage
By following these steps, you can significantly extend your stun gun’s operational lifespan and ensure it remains ready when you need it most.
Preventative Tips to Maintain Optimal Charging Performance
Maintaining your stun gun’s charging efficiency starts with establishing a consistent care routine. Always use the charger that came with your device or a manufacturer-recommended replacement to ensure compatibility and avoid electrical issues. Avoid overcharging by unplugging the unit once fully charged, as prolonged exposure to power can degrade the battery’s lifespan. Additionally, store your stun gun in a cool, dry place to prevent moisture buildup and extreme temperature exposure, both of which can harm internal components and reduce overall charging performance.
Simple practices that go a long way include:
- Regularly inspecting charging ports for dirt or corrosion and cleaning gently with a soft, dry brush.
- Keeping charging cables untangled and avoiding sharp bends to prevent internal wire damage.
- Charging your device at regular intervals even if not in frequent use, to maintain battery health.
- Checking the power source’s stability to avoid fluctuating currents that may compromise charging integrity.
To Wrap It Up
Troubleshooting a stun gun that won’t charge can be frustrating, but with a systematic approach and attention to detail, most common issues can be identified and resolved. From checking the charging cable and power source to inspecting the internal components, taking these steps ensures your stun gun remains reliable and ready when you need it most. Remember, regular maintenance and proper storage go a long way in preventing charging problems. If you’ve tried all the troubleshooting tips and your stun gun still won’t charge, it may be time to consult a professional or consider a replacement. Staying proactive with your device’s care not only extends its lifespan but also ensures your personal safety is never compromised.Check Our Other Blogs
- StunGun – Your Trusted Source for Stun Guns, Laws, and Self-Defense Tips
- PepperSprayLaws – Your Trusted Resource for Pepper Spray Information
- StunGunLaws – Your Trusted Guide to Stun Gun Legality and Safety


